Saturday, December 5, 2020

use This keyword with Arrow Function in Javascript implementation

 when we write JavaScript function with Arrow to eliminate the function key, we must be extra caution, since THIS keyword object reference will be determine during the runtime, if the function is in the global scope, then THIS will point to the window object. if the function is pointing within the object, then THIS will only point to the object itself.

here is a simple example.

print: (delay=3000)=> {
    setTimeout(() => {
    console.log(this === window)
    }, delay)
}

the output is true. since THIS is execute with under the global scope.


after I change the Arrow function to a regular function, then  THIS key is reference to the object level

function print(delay=3000){
    setTimeout(() => {
    console.log(this === window)
    }, delay)
}

though arrow function is very handy in the javascript implementation, but we still have use it with care.


Friday, December 4, 2020

how to launch a program with Run as Administrator privilege in powershell?

 when you in the powershell window, you want to launch another app with run as administrator right. here is a way to go

ex: launch powershell with administrator privilege

start-process powershell  --Verb  runas

 run visual studio with administrator privilege

  start-process devenv.exe --Verb  runas


Thursday, August 13, 2020

How to add gwin to windows CMD or cmder?

it is very useful to use vi editor to compose yaml file for Kubernetes. we can launch the VI or VIM editor by typing vi or vim in the CMD or cmder.

 if you are not comfortable working with vi or vim. there is GUI version of vi call gwin.

you can download a copy of gwin for windows from the link below.

 https://www.vim.org/download.php#pc

1.  you should run the exe file with administrator privilege to ensure the file can install into the proper location.

2. second step you can either run this script in the powershell window

 Set-alias gvim "C:\Program Files (x86)\Vim\vim82\gvim.exe"

or add the application path (C:\Program Files (x86)\Vim\vim82\gvim.exe) to the Path variable in the Environment Variable Window


then you can launch gwin editor from CMD or cmder


Monday, July 13, 2020

how to setup Azure Kubernetes Service cluster and configure Kubernetes dashboard with AZ CLI?

it is very easy to create and run a  AKS cluster with few AZ CLI commands.

1. create a resource group for AKS

az group create --name dan-aks-rg --location eastus

2. create an AKS cluster

az aks create --resource-group dan-aks-rg --name dan-cluster

3.get the credentials for the cluster, this will download the credetenials and store in the config file
under this path C:\Users\admin\.kube

az aks get-credentials --resource-group dan-aks-rg --name dan-cluster

4. install the Kubernetes cli utility

az ask install-cli

5. install Kubernetes dashboard

kubectl apply -f https://raw.githubusercontent.com/kubernetes/dashboard/v2.0.0/aio/deploy/recommended.yaml

6. Access the dashboard. there are two way to access the Kubernetes dashboard.
 from AZ CLI

az aks browse --resource-group dan-aks-rg --name dan-cluster

it will automatically lauch in the web browser

http://127.0.0.1:8001/api/v1/namespaces/kube-system/services/https:kubernetes-dashboard:/proxy/


or we can use kubectl proxy to access the Kubernetes Dashboard UI. Type Kubectl proxy in the CMD windows, then hit enter and launch the web chrome and paste the following url in the url windows to launch the kubernetes dashboard.

kubectl proxy 

http://localhost:8001/api/v1/namespaces/kubernetes-dashboard/services/https:kubernetes-dashboard:/proxy/#/overview?namespace=default

7. Trouble shot tips

if you see an empty kubernetes dashboard with warming message
"secrets is forbidden: User "clusterUser" cannot list resource "secrets" in API group "" in the namespace "default"

it is permission issue. you can resolve this following steps, you need to replace the clusterUser with specific name that was shown in your error message.

  • kubectl delete clusterrolebinding kubernetes-dashboard

    kubectl delete clusterrolebinding kubernetes-dashboard -n kube-system

    kubectl create clusterrolebinding kubernetes-dashboard --clusterrole=cluster-admin --serviceaccount=kube-system:kubernetes-dashboard --user=clusterUser

https://kubernetes.io/docs/reference/generated/kubectl/kubectl-commands#-em-clusterrolebinding-em-

Wednesday, July 1, 2020

how to use build-in debugger to debug a Node.js appliation?

it is very important to trouble shot an issue or bug in the application development. i will show you how to use the debug tools that built into Node, that let you step through the code.

step 1. add debugger; before the line that you want to debug

 show: (reqresnext=> {
    let userId = req.params.id;
    User.findById(userId)
      .then(user => {
        debugger;
        res.locals.user = user;
        next();
      })
      .catch(error => {
        console.log(`Error fetching user by ID: ${error.message}`);
        next(error);
      });
  },


step 2. run node --inspect-brk main.js command in your project's terminal window to launch the build in debugger

C:\code\Node\unit5\recipe_app (master) (capstone@1.0.0)
λ node --inspect-brk main
Debugger listening on ws://127.0.0.1:9229/d66cdcb4-12df-4f71-80db-43d9c5ba6adc
For help, see: https://nodejs.org/en/docs/inspector
Debugger attached.

step 3. launch the chrome browse and type chrome://inspect in the url window.


click on the inspect link. it will start breaking at the first line of main.js


you can either go to line by line with press F10 function or key or press the continue button to go the the line of code with debugger;


you can also go to the node tab under source section, then you can pick anything javascript files to set the breakpoint in order to inspect or trace the code and values


now you can easily fix the trouble code.


how to run a node.js application in debug mode?

it is very convenient to trouble shot a node.js application when we run it under debug mode.

here is the line that we can execute in the command line within the project folder in the CMD

set DEBUG=* & node main (for project with main.js as the start up file)

or
set DEBUG=* & node index (for project setting index.js as the entry point.

or we can add the following code to the script section in the package.json file.

"debug": "set DEBUG=* node main"


here is the sample from my node.js application.

  "scripts": {
    "start""node main.js",
    "test""echo \"Error: no test specified\" && exit 1",
    "debug""set DEBUG=* & node main"
  },

then we can start the application with the following line

npm run debug

Monday, June 29, 2020

how to test JWT token with CURL in command line?

after we implement api to load the JWT with basic authentication via login form that requried user to provide email and password in order to access the api with JWT authorization.

it is very to easy to test the logic by executing the following command line in CMD/cmder

curl -d "email=test@email.com&password=test1234" http://localhost:3000/api/login

the output is below indicating that the JWT token is generated with provided login information.

λ curl -d "email=test@email.com&password=test1234" http://localhost:3000/api/login
{"success":true,"token":"eyJhbGciOiJIUzI1NiIsInR5cCI6IkpXVCJ9.eyJkYXRhIjoiNW
VmYTA5ZWEzMGE2ZTAwYzIwMmJhNjhiIiwiZXhwIjoxNTkzNTQ0NDM4NzE2L
CJpYXQiOjE1OTM0NTgwMzh9.IHTlnRuOg_AlppmraGMY8xibrGNAoGGSMA3yGx_2DmI"}

how to use environment variable in Node.js and Express Server development?

it is very convenient to use environment variable during the web development with express server and Node.js

here is the steps to configure the environment variable in the  project.

1. add a .env file to the project folder.

2. install the dotenv package
    npm i dotenv -S

3. add dotnet library to the file that will load the environment variable. in my case it is from a controller

dotenv = require('dotenv');
dotenv.config();

4. add required variables to the .env file

#test token
TOKEN=recipeT0k3n

# API
API_TOKEN=recipeAPIT0k3n

5. load the environment variable, it must be the same file in the step 3

const token=process.env.TOKEN || "recipeT0k3n",

or you can define it as global variable in the index.js or main.js with the following snippet of code

dotenv = require('dotenv');
dotenv.config();
export const token=process.env.TOKEN || "recipeT0k3n",


Sunday, June 21, 2020

Handy npm commands

1. use npm init to generate a package.json file for the application

2. use npm install --save flag to mark the package as an application dependency.

for example when i ran npm install express --save, the process will automatically add express to the
dependencies section.

use npm install --save-dev to install the library for the development of an application only

{
  "name""first_express_project",
  "version""1.0.0",
  "description""first web project build with express",
  "main""main.js",
  "scripts": {
    "test""echo \"Error: no test specified\" && exit 1"
  },
  "author""Dan Deng",
  "license""ISC",
  "dependencies": {
    "express""^4.17.1"
  }
}

3.  run npm docs library name to access the library documentation.

for example npm docs express will launch the default web browser to http://expressjs.com.

4. npm i nodemon -g to install the node monitor package to force restart the application. after any change to the project.
use the following configuration to setup nodemon to run the application

 "scripts": {
    "start":"nodemon main.js",
    "test""echo \"Error: no test specified\" && exit 1"
  },

then run npm start to launch the application.

λ npm start

> first_express_project@1.0.0 start C:\code\Node\first_express_project
> nodemon main.js

[nodemon] 2.0.4
[nodemon] to restart at any time, enter `rs`
[nodemon] watching path(s): *.*
[nodemon] watching extensions: js,mjs,json
[nodemon] starting `node main.js`
The express server has started and is listening on port number : 3000


Tuesday, June 16, 2020

how to implement a simple typesafe assertion library in Typescript?

we can assert typesafe to ensure that parameters with specific type in typescript.

here i will demostrate a simple function to ensure that input parameters are the same type

type is={
    <T>(aTb:T):boolean
}

let isSame:is=<T>(
    first:T,
    second:T
)=>{
    return first==second;
}

function print(b:boolean){
    console.log(b);
}

print(isSame("string","anotherString"));
print(isSame(true,false));
print(isSame(4242));
print(isSame(10'foo'));

src/index.ts:73:18 - error TS2345: Argument of type '"foo"' is not assignable to parameter of type 'number'.

73 print(isSame(10, 'foo'));
                    ~~~~~


Found 1 error.


we can easily get the catch the error in compile time. that is the magic of typesafe in typescript, the compiler enforce the type-safe check in the compile time. 


Monday, June 15, 2020

Types in TypeScript

1. Object vs object

Object represents alll types in typescript include all primitive type and non-primitive type.

primitivie type has the following types:
  • boolean
  • number
  • biginit
  • string
  • symbol
  • null :means absence of a value
  • undefined : variable that has not been defined.
in contrast object represent non-primitive type.

we can define a object with property, optional property and index signature.

let exampleO :{
      p1: string,
      p2?: number //optional property
     [p3: string]: string //index singatue [key:T] : U to indicate all keys of T(T should be number and string only) must have values of type U
}

Typescript use index signature to add more keys to the object.

2. Array vs Tuples

both types use square bracket []

let a: string[] //declare a string array

let b: [string] //a tuple

let c: [string, string, number] // a tuple with three elements

3. use const enum to prevent the unsafe access

enum Color {
     Red,
     White,
    Green
}
we should rewrite it with const enum for a safer subset of enum behavior, since CONST ENUMS doesn't let you do reverse looks up. However number value enums still will allow all numbers assign to enums, we can avoid this issue with string-value enums

const enum Color {
     Red,
     White,
    Green
}


Tuesday, May 26, 2020

How to configure the development tools for React Development?

The React development tools provide a small number of configuration options, which will allow us to configure the environment variables for the specific project.

here is the steps  for setting for the configuration.

1. create a .env.local file in the project folder.

2. add options to the file. I only add three options to the setting file

REACT_EDITOR will specific the editor  for the feature that opens the code file when you click on a stack trace in the browser. it is very convenient for tracing the error from browser to the code editor.

PORT :specify the port for the project being host.

HTTPS: will have SSL enable if it is true.

REACT_EDITOR=code
PORT=3500

HTTPS=true


Monday, May 18, 2020

React Application Development Quick tips and trick

1. it is Case sensitive to import library in the class.
Import react from 'react' will cause the issue with following error message

 Line 7:5:    'React' must be in scope when using JSX  react/react-in-jsx-scope
  Line 8:7:    'React' must be in scope when using JSX  react/react-in-jsx-scope
  Line 9:9:    'React' must be in scope when using JSX  react/react-in-jsx-scope
  Line 10:9:   'React' must be in scope when using JSX  react/react-in-jsx-scope
  Line 11:16:  'React' must be in scope when using JSX  react/react-in-jsx-scope
  Line 13:9:   'React' must be in scope when using JSX  react/react-in-jsx-scope


the corrected syntax is Import React from 'react', the same apply to import Component


2. use npm init react-app <my-app-name> to create a react app without any specific template.
if you want to create  npx create-react-app <my-app-name>, you must provide a template like this below

npx create-react-app my-app --template typescript


3. we must use THIS keyword to access the variables and functions defined inside the component.
you will get this error message when you try to access the variable without THIS. The this keyword refers to the component instance.

./src/App.js
  Line 37:18:  'count' is not defined  no-undef

export default class App extends Component{
  count=4;
  isEven = () => this.count%2==0 ?"Even""Odd"
  render = () =>
    <h4 className="bg-primary text-white text-center p-2 m-1"> 
number of things: {this.isEven()}</h4>
}


4. use spread attribute to pass properties to component, for example {...this.props}

 render={ (routeProps=> 
                            <DataGetter { ...this.props } { ...routeProps } >
                                <Shop { ...this.props } { ...routeProps } />
                            </DataGetter>
                        } />


Sunday, May 17, 2020

how to use NVM in windows environment?

since NVM is target for Linux and Mac enviroment, which will allow us to setup the specific version of node.js for development. NVM stands for Node Version Management.

the official NVM only will support Linux and Mac, but Corey Butler build a a new utility to make NVM working exact the same in Windows enviroment. you can get more information and download from this link below

https://github.com/coreybutler/nvm-windows


after you complete the installation, then you can launch the CMD to run all the NVM commands like you execute in Linux and Mac

nvm     ---to all available command


nvm list available --- get all availale list of node


nvm install <version>  -- to install the specific version of Node.js

nvm use <version>  -- to set the specific version of Node.js for development


Sunday, April 19, 2020

How to add a new state to the BUG work item in Azure DevOps?

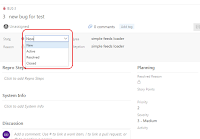
when we create bug work item. by default it only has four states


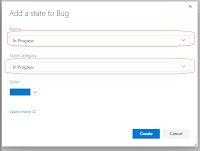
We might like to have some new state like In process to indicate that the team is currently working on the work item. we just have to following the steps below to create a new state for the work item.


1. go to the project blade and click on the work item menu


2. select one work item from the list


3 click on the ... button to expand the menu item and select the customize item.


4. create on the create State button to add a new state.


5. Type In Process to the Name field and and select In Process in the state category.


6. go back to the work item page. you will see the new state in the drop down list.


Thursday, April 2, 2020

how to configure RDP to linux server?

i am working on the docker for asp.net core MVC. since Linux is best suit for docker. i spin-uped a Linux VM in Azure.

as i want to use linux server for development, i have to RDP to linux and setup the environment.

here is the link that you just follow and  easily configure the development environment.

https://linuxize.com/post/how-to-install-xrdp-on-ubuntu-18-04/

here is the screen shot of the my linux server via RDP


Sunday, March 29, 2020

how to fix "Access to XMLHttpRequest at 'http://localhost:7071/api/' from origin 'http://localhost:3000' has been blocked by CORS policy" in Azure Serverless implementation?

when i implemented the Web API using Azure functions in Azure Serverless development. i try to run the Azure fucntion in the localhost from visual studio code. the error came up immdiately after i test the create function.

"Access to XMLHttpRequest at 'http://localhost:7071/api/createSpeaker/' from origin 'http://localhost:3000' has been blocked by CORS policy: Response to preflight request doesn't pass access control check: No 'Access-Control-Allow-Origin' header is present on the requested resource."

the error message clearly indicated that it was a CORS issue. which is the web app hosts on port 3000 and tries to access the web API hosts on port 7071.

according to the microsoft document. it suggested that we should add the following configuration to the local.settings.json file which is the configure file for azure functions running in local mode.

https://docs.microsoft.com/en-us/azure/azure-functions/functions-run-local?tabs=windows%2Ccsharp%2Cbash

"Host": {
    "LocalHttpPort": 7071,
    "CORS": "*",
    "CORSCredentials": false
  },

however the above never works for me. acutally the following command line did fix the issue

func host start --cors *

Happy programming and enjoy the fun